
Jolie Paints: The Beginner's Guide (Part 1)
We discovered Jolie Paints a few years ago while searching for furniture paints for a personal project we were working on - and they quickly became a shop staple at Verde. The Jolie Paints range are a gorgeous chalk paint which means easy to use, low or no smell, environmentally sound and wash up in water. Most of the time they require little to no prep and give a gorgeous, upmarket chalk-effect finish. They're just perfect for giving tired pieces a brush of fresh life. Plus, upcycling furniture pieces can keep them out of landfill, and these paints make it easy to adapt pieces to your personal style and colour-schemes.
We loved the huge colour range of Jolie, and just how easy it is to use them! There is a standard range of 42 beautiful colours that then can mix to make hundreds of new colours. We have colour charts instore for all the colour ideas you can create.
For anyone who's been thinking about having a go at a painting project, we've put together this little guide all about how to do it and getting you started - from choosing colours and brushes to the final finishes. The reality is, there isn't any way to muck it up - they are so easy to use!

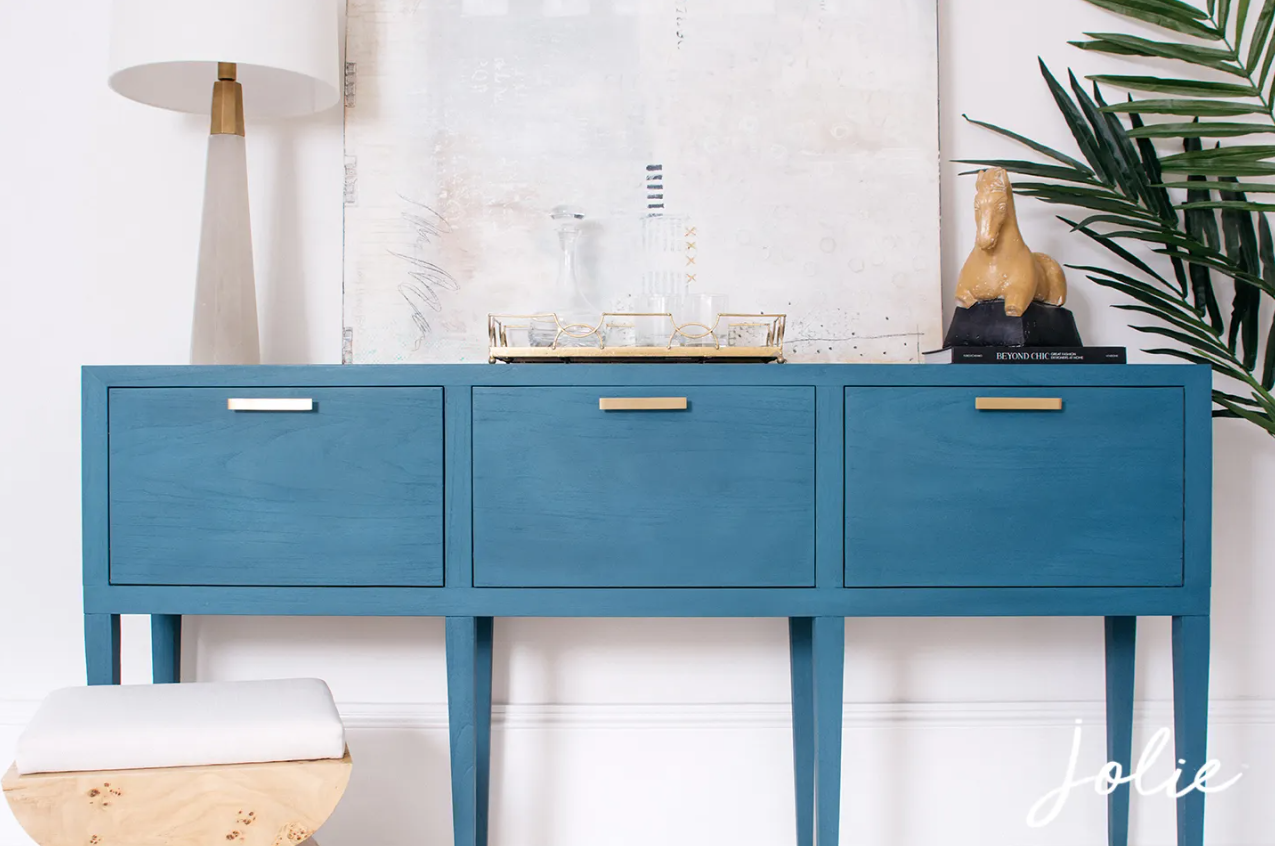
 You can paint almost anything with Jolie Paints. They're designed to be versatile and adhere to a wide range of surfaces. We've painted tables, kitchen hutches, chairs, bookcases, sidetables, hall tables and chests of drawers - and we're always thinking about our next project! Everytime we see a piece of furniture, it's being assessed as an upcycle rejuvenate painting project.
Have a look at some of the before and afters in this blog for some inspo for what your next venture might be. And for a full rundown on what kind of surfaces you can paint, check out the section on prepping your surfaces!

 The first step of any project is always choosing your materials - and the first step for this one is choosing your colours! We find often that the colour you go with is determined by the kind of piece you're painting, and the purpose you'd like to it to serve once it's painted. For example, if you're painting a sideboard or hutch you might like to go with a more neutral colour that fits into your established colour scheme. Pieces like bedside tables or chairs might be intended as statement pieces, so you can go for jewel tones and brighter colours to make them stand out and give your space a colourful focal point. I've seen the most amazing transformations of sideboards into brilliant yellow and bedside tables into the most gorgeous blush pink. The classic noir and deep deep navy or also really popular chooses and give lovely depth in a room.
The easiest way to choose a colour that will fit into the palette you already have is to match undertones. If your space has a majority of cool-toned colours (think blues, greens, greys, cool purples, and cool whites), then a paint in a cool tone will fit in seamlessly. The same goes for warm colours - these are your rusty reds, burnt oranges, sunshine yellows, and cream coloured neutrals.
For the majority of painting projects, the Jolie Ultra-Matte paints are ideal - they're a classic, "do everything" kind of paint and are especially perfect for furniture projects. You can achieve different finishes depending on what kind of final look you're going for using their sealing waxes and varnishes - we'll cover all of that in part 2!
Have a look at our range of Jolie Paints to start picking out your colours!

 Buying the right amount of paint can be a very tricky equation - we've all had that experience of not buying quite enough paint, only to get more and have way too much left over, right? Luckily, Jolie has a guide on how to buy the right amount of paint based on the square meterage of what you're painting.
Generally speaking you'll want to do around 2-3 coats of paint to get full and even colour coverage. If you're painting a piece that is a very dark colour and you'd like to use a light colour, like one of the whites, we also recommend using a mid-tone neutral like French Grey, Uptown Ecru or Farmhouse Beige as a base coat. Your base coat will need about 2 coats generally, so don't forget to factor this in as well!
To calculate the total coverage you'll need, measure your surface to get an area in square metres and multiply this by the number of coats of that colour you'll need. So, if you were painting a cabinet door that measured 0.5m x 0.8m for instance, and you were doing three coats, your required coverage would be (0.5x0.8) x 3 = 1.2 square metres.
We stock Jolie paints in two sizes: the sample pots, which have a coverage of approx. 1.7 square metres, and the quart containers (just under 1 litre) which have a coverage of approx. 13.9 square metres. So for the calculation we just did, one of the sample pots would be about right, with a little left over to err on the side of caution. The best way to figure out how many pots of paint you need total for your project is to use these formulas:
required coverage (sq. metres) ÷ 1.7 = no. of sample pots needed
required coverage (sq. metres) ÷ 13.9 = no of quart pots needed
Generally, it's better to overestimate a little bit - this way you know that you'll definitely have enough, and might have a little bit of leftover for any touch-ups, refreshes, or small projects you embark on in the future!

 One of the best things about Jolie Paints is that in most cases, you need to do almost no prep and can simply paint straight onto your piece. If your piece has noticeable dust, dirt or grime, you do need to clean it with a safe-to-use biodegradable cleaner and rinse with warm water. The biodegradable part is important here - even trace amounts of harsh chemical cleaners can interfere with the paint's ability to adhere to your surface, so using a cleaner that is biodegradable ensures maximum coverage of your colours and a long-lasting paint job. It's also better for the environment!
The best surfaces to use Jolie Paints on include most woods, any previously painted and waxed surfaces, metal, matte plastics, brick, concrete, and stone. However, it's not recommended that you paint directly over teak, eucalyptus, shiny tile, or any powder coated metal surfaces, but there are some tricks to help make it possible.
Raw Wood
To paint onto raw, untreated wood, we recommend applying a clear shellac first to block any colour bleeding from tannins in the wood. After painting your first coat, you might also find that you need to sand your surface in order to achieve a smoother finish, as the moisture from the paint can raise the grain of some types of wood.
Stained Wood
Some stains on woods can bleed through your first coat of paint - this generally happens with woods like mahogany, cherry, or open-grained woods like oak. If you do notice any discolouration, you can apply two thin coats of shellac to prevent the stain from peeking through. It's not recommended that you sand mahogany before painting as its stains are especially likely to bleed through.
Brick
Spritzing a brick surface with water before painting can help draw the paint into the nooks and crannies, and give you a more even and full coverage.
Plastic & Metal
If you're painting a plastic or metal that is particularly shiny or smooth, giving it a light sanding with a medium sandpaper before painting helps your paint adhere properly to the surface. We also recommend a long drying time between coats of paint - allow about 48 hours after your first coat before applying a second one. Leaving the first coat for such a long time allows the curing process to begin and the paint to harden, which increases adhesion for your second coat.
Fabric
Jolie Paint can also be used on textiles and fabrics! We gave it a go ourselves when painting a chair that needed a bit of a refresh, and it turned out just how we wanted. If you're wanting to paint fabrics, you'll need to thin your paint with water, adding up to about 40% water to your paint in a mixing container. Then you can apply the paint to your fabric in thin layers, leaving plenty of time between coats for the paint to dry - preferably overnight. The best fabrics to paint are natural fibres and leathers, as these will have the best adhesion. Painting fabrics is also most effective on upholstery that is pulled taut. You can paint on furniture that has a lot of give, like a comfy couch that you sink into, but you're likely to notice cracks in the paint over time.
Odorous & Stained Furniture
If your piece has any unwanted odours like smoke or mustiness, or stains like water rings and coffee stains, it's recommended that you apply a thin coat of shellac to your piece before you paint it. This helps to block the odours and any stains from pulling through the painted surface.

 Now that you've prepped your surface... let's get going!
Before you open your tin of paint, turn the can upside down and give it a good shake for at least 30 seconds, to make sure the pigment is evenly distributed. If you've had the tin sitting on a shelf for a long time, you can flip it upside down and let it sit for a few hours. This helps to distribute any pigment that might have settled at the bottom.
Once you've shaken up your paint, open it up and give it a good stir. Make sure to pull the paint from the bottom up to the top - stirring well also ensures that pigment is evenly distributed throughout the paint before applying!
If you need to thicken your paint for a project, you can leave the tin with the lid off for around 30 minutes before painting, which allows some of the water to evaporate and the paint to thicken. If you need to thin your paint, you can add water to it, as Jolie Paints are water based. We recommend doing this in a separate mixing container so you can add water in small, controlled increments.
Now, it's time to start painting! We love using the Jolie Signature Brush range - they're so versatile, they are great quality and particularly great for painting furniture. Keep an eye for our part 2 of this blog series where we'll be covering all the different finishes that you can get using Jolie Waxes and painting techniques!
WAXING - waxing is essential!
Don't forget that all your Jolie paints need a wax over the top to finish the painting process, seal the paint and prevent wearing and scratching. There are clear waxes and coloured waxes. Always begin with your clear wax. Brush it on using your wax brush, then wipe it off a few minutes later. Usually it's best to do this twice.

Happy Painting! x
Let us know how your projects go - we love seeing transformations. Just tag us #verde_hobart or @verde_hobart

Leave a comment
This site is protected by hCaptcha and the hCaptcha Privacy Policy and Terms of Service apply.